

There is a major difference between pioneer and modern pantries. In the growing western United States, other than a general mercantile that carried bulk staples, grocery stores did not exist. Often, people lived far from town - or even their neighbors - which meant households needed to be nearly self-sufficient. Often families would trade excess crops -- one family would grow and put up extra berries to exchange with a neighbor who had apple trees and excess crop. When you went into town for supplies, it could be two or three hours (or more) each way, so you’d keep a running list and stock up. If you lived where winters were particularly brutal, you might even stock up for the entire winter by October!
Many of the pioneers’ cooking supplies are still staples in today’s kitchen: dairy and eggs, produce, and meat. One major difference is the dairy and eggs did not come from the store -- they were provided by the milk cows and chickens you raised. Fresh produce was eaten in season, and preserved in glass jars for eating during the winter. Root cellars held these precious jars, as well as hardy vegetables like potatoes, carrots, and onions. Meat was eaten both fresh and preserved. A fresh roast was eaten when the stock was killed, and then the extra was smoked, salted, pickled, and canned meats also lined the root cellar shelves. Some people raised livestock for food - often pigs and chickens. (Just make sure you catch the ornery old hen when Mama sends you out to butcher a chicken for dinner, and not one of her good layers!) Everything was used or put up for later use in some way or another. “Waste not, want not,” was the pioneer mindset. Some of these “use it up” recipes remain popular; Pennsylvania Dutch scrapple is a staple in southeast Pennsylvania and South Jersey diners. A family made everything stretch, because they could not afford to waste much. On a wagon train, where your supplies are even more limited, you could afford no waste at all.
 |
| Gary Halvorson, Oregon State Archives, via Wikimedia Commons |
A common pioneer recipe I tried is fried chicken. Chickens were common on almost every farm; hens provided a steady supply of eggs and the addition of a rooster or two to the coop provided a steady supply of chicks. This was a popular meal because it did not require many ingredients, and could be prepared in small or large batches. It also was good hot or cold, making it perfect for a farm wife to take to her husband working in the fields, or a chuck wagon master to serve to cowhands eating in shifts.
I prepared our dinner a little differently, using a brine to help flavor the chicken and allergy-friendly ingredients. Where we did not change the recipe was our cooking fat or pan. Vegetable oil wasn’t invented at this time -- for cooking, your options were lard (rendered from butchered hogs), tallow (from cows), and butter. Butter burns well below 300°F, so lard was used for frying. There are many medical opinions these days about lard and vegetable shortening, but lard works, so I’m going with it. I also used a cast iron frying pan - a kitchen staple for centuries that no self-respecting pioneer would cook without.
A brine is a salt and water solution with flavorings added. The meat is placed in it and the solution is carried into the meat via osmosis, adding juiciness and flavor. If you aren’t heading into the yard to dispatch your chicken and are instead hunting through your freezer, you don’t even have to defrost the chicken before brining. The salt water will help it defrost quickly. Place it in the brine frozen, and keep checking it. Once the meat is fully defrosted, start the clock on the brining process.
 Gluten & Dairy Free Pioneer Fried Chicken
3 lbs chicken parts (drumsticks, thighs, or breasts)
Brine
2 c salt
1 c honey
1 gal water
8 cups (two pounds) ice
Coating
2 eggs
2 c So Delicious coconut milk
2 c. King Arthur Gluten Free All Purpose Flour Mix
1 Tbsp garlic powder
1 Tbsp chili powder
1 Tbsp black pepper
1 ½ cups lard
1. In a large stockpot, combine salt, honey, and water. You can either heat them together until the salt is dissolved, or use hot tap water.
2. Add ice to cool down the solution

3. Submerge chicken in the brine, and refrigerate for at least two hours. This is important because the chicken and the solution need time to achieve equilibrium. The longer it brines, the more flavor will be absorbed, but do not brine for more than 12 hours, or the chicken will be mushy.

4. Remove chicken from brine. Pat dry with paper towels.
5. In a wide, shallow container, mix flour and spices together. Dredge chicken lightly in flour, and place on a rack to set flour.

6. Heat a 10” cast iron skillet over medium heat. Add lard to the pan, and allow to melt and then heat to about 325°F. (Do not go over 350°F.)
7. In a wide and shallow container, mix eggs and milk together. The separation of your liquids from dry ingredients is important.

8. With one hand only, take a piece of chicken, and completely coat it lightly in the liquid mixture. Using the same hand, move the coated chicken to the flour mixture used earlier.
9. Using your other hand only, apply another dry coat (you can pack the flour mixture on a little heavier than the first coat). Return chicken to the rack for the coating to set. Repeat process until all the chicken is coated.
Note: You only want to use one hand for each mixture because the liquid will cause the dry mixture to stick to your hand, not the chicken.

11. Check your lard temperature. When it is hot enough, use a pair of tongs to carefully place the chicken in the pan. (The melted lard will cause severe burns if it splashes on you, so place the chicken all the way in the pan before letting go.) Cook chicken for 10 minutes on each side (internal temperature should be about 180°F).
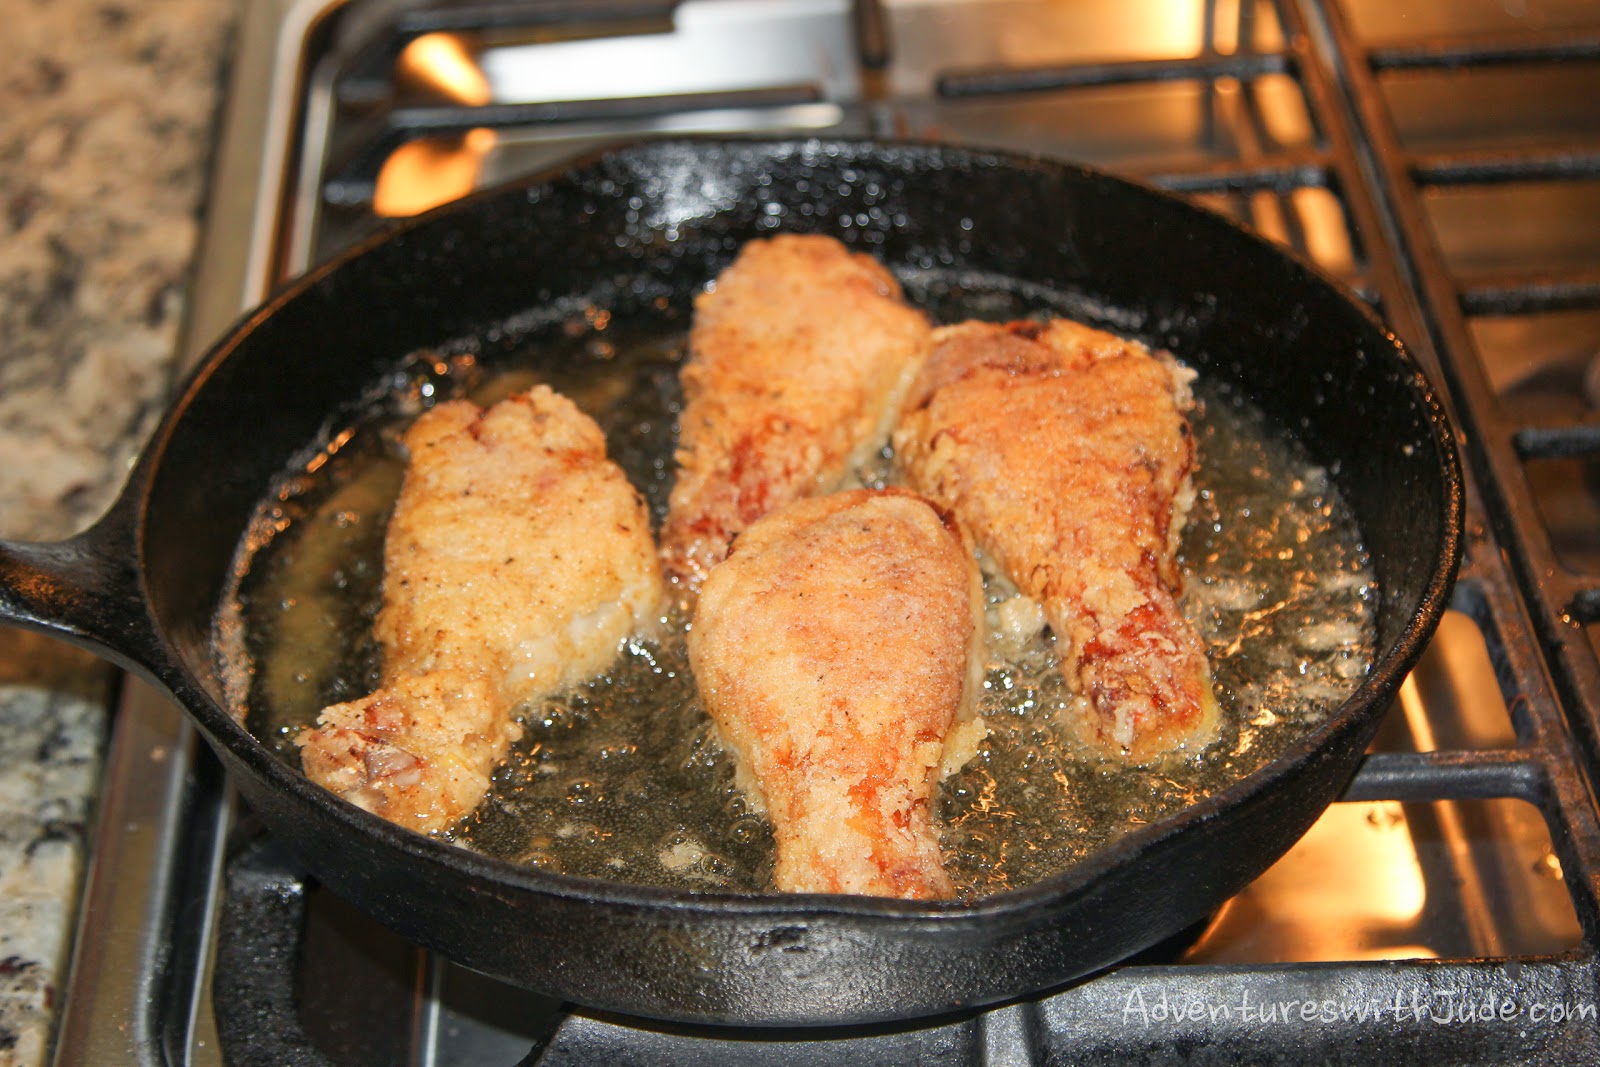
12. Remove chicken and drain on paper towels. Cover loosely with foil to keep warm. Cook chicken in batches until it is all prepared. Make sure to check between batches that there is both enough lard in the pan (about 1 to 1 ½ inches) and that it has returned to 325ºF.
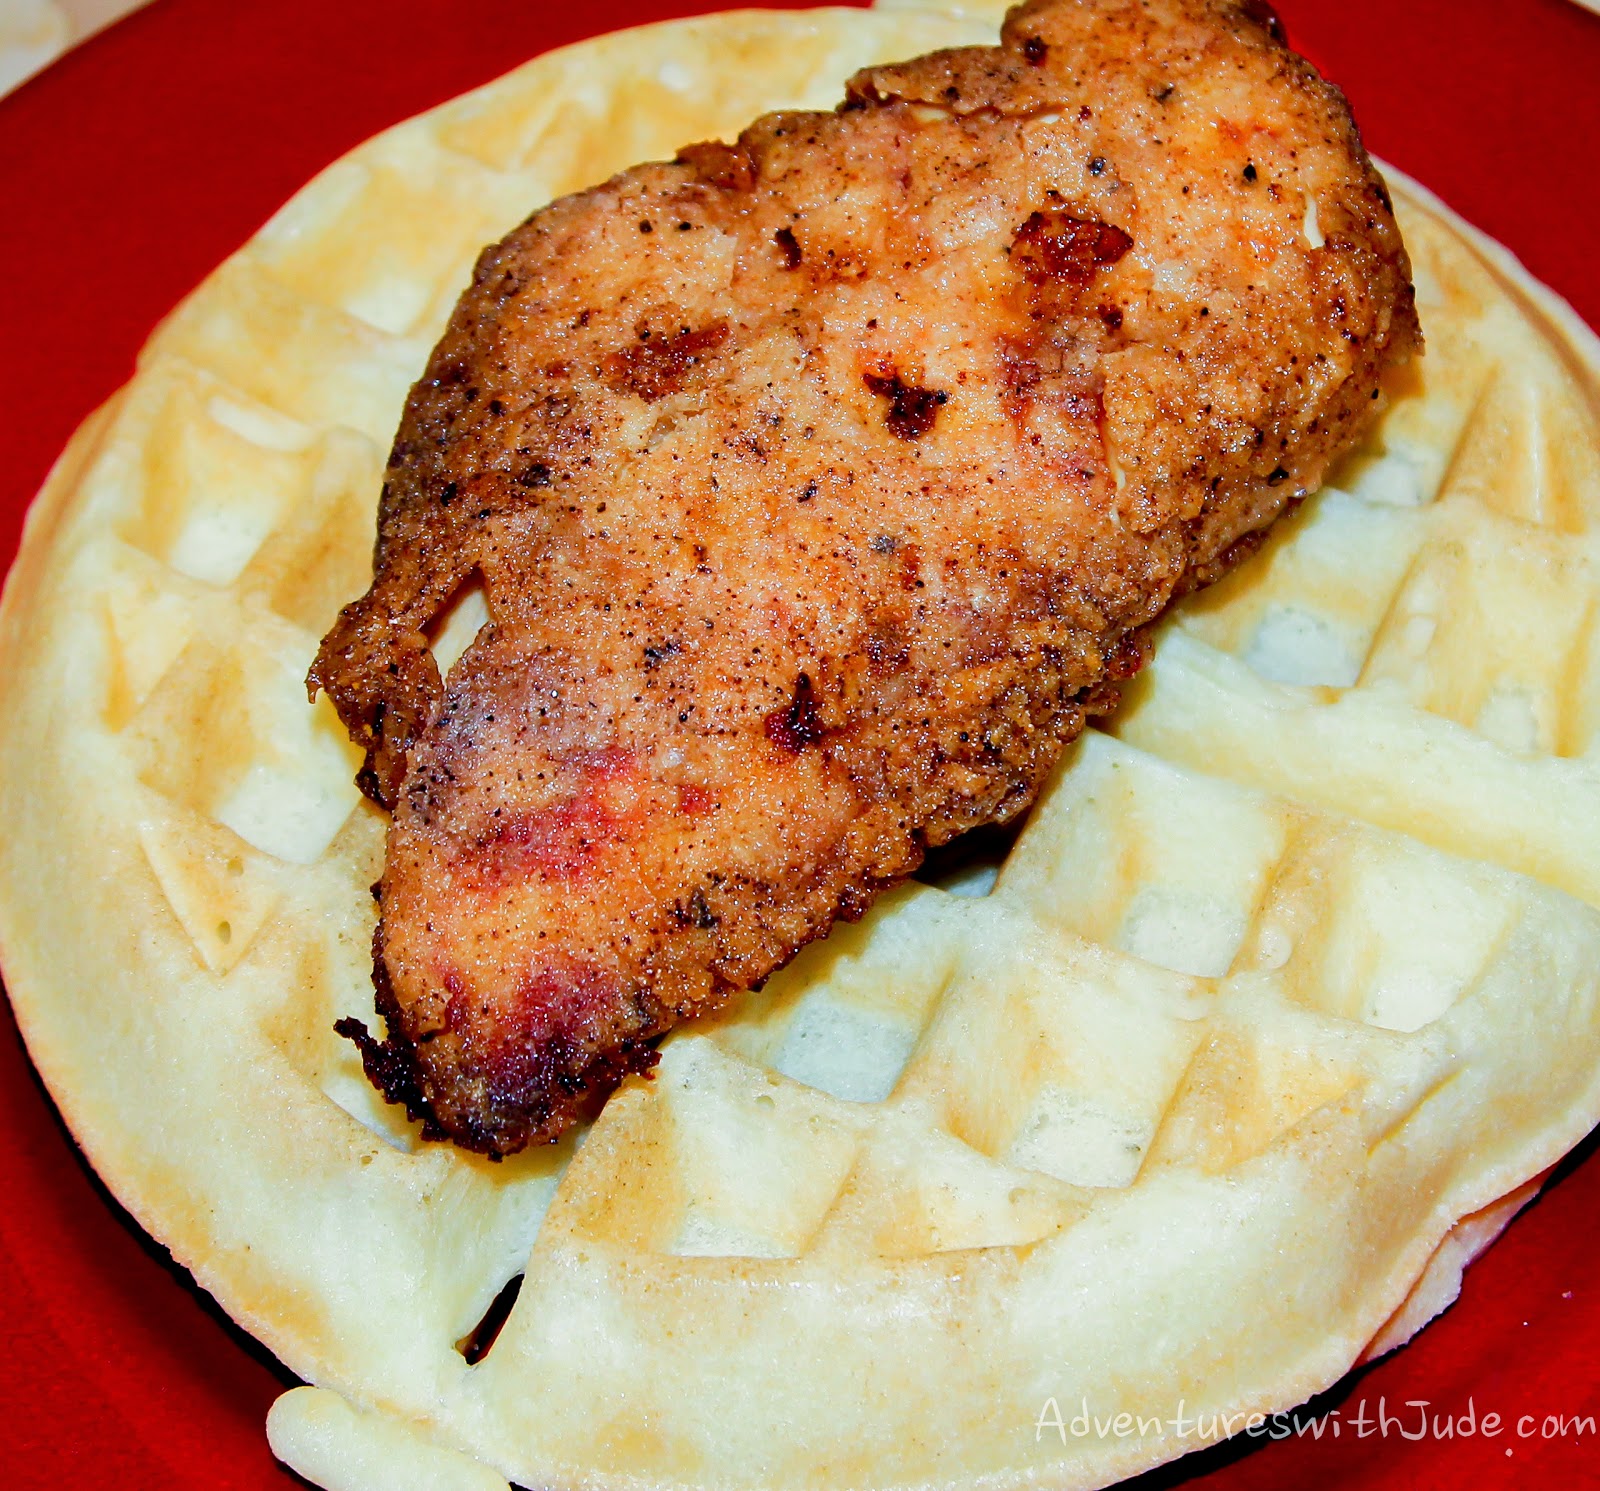
A traditional farm side dish is potatoes -- either mashed potatoes or potato salad. Another option - an American “soul food” favorite - is to serve the chicken with waffles and top with honey or maple syrup.


©2012- 2014 Adventures with Jude. All rights reserved. All text, photographs, artwork, and other content may not be reproduced or transmitted in any form without the written consent of the author. http://adventureswithjude.com
Looks Great! Thanks for sharing at Tips and Tricks!
ReplyDeleteThank you for this GFCF recipe! Half my family is GFCF, and I have missed fried chicken every now and then! I just haven't tackled trying it yet, but I will definitely give this a try.
ReplyDeleteEnjoy! Neal thinks it's possibly the best fried chicken he's ever had -- and before he went GF he loved fried chicken. It's time consuming to cook for us (because with so many people, even with two pans it takes a while!) but I think well worth it...maybe we'll have it every couple months now, instead of...I don't know how long. I think the last time I may have made fried chicken was a year ago?
ReplyDeleteThis looks really good. My husband loves fried chicken.:-) Thanks for linking up with "Try a New Recipe Tuesday." Hope you can join us again this week. http://our4kiddos.blogspot.com/2014/06/try-new-recipe-tuesday-june-18.html
ReplyDeleteNope..that's a typo I will definitely correct! Thanks for calling it out. King Arthur has a GLUTEN FREE All Purpose Flour, which is what we use in our house. REGULAR all purpose flour defintely has gluten - it gets it's plastic-y powers by kneading it, but the protein itself is still there in wheat/barley flours.
ReplyDeleteI just love fried chicken! I found you over at the The Wednesday
ReplyDeleteRound-Up link party. I host Tickle My Tastebuds Tuesday and would love it if you linked up this recipe. I’m sure our party goers would love it as
much as I do. Here is the link http://bit.ly/1wsjSLy. Have a wonderful day!!