Showing posts with label Real Men Make Quiche. Show all posts

Monday, May 2, 2016

Espresso Custard (Z is for Zabaglione)

Simple yet elegant dessert naturally gluten and dairy free

Zabaglione is an Italian custard-like dessert that can go with just about anything.  Fresh fruit? It's made for that! A little something to dip your biscotti in, or top your pound cake?  Of course.  It's slightly thicker than a sauce but not quite as thick as a pudding - just viscous enough to stick to what you've added to your dessert bowl.  Tradition calls for a sweet wine as the flavoring liquid -- marsala is common here in the United States, but a Nonna would use whatever she had on hand.  We've made ours kid-friendly by flavoring it with strong coffee instead of wine.  (You could also use apple or white grape juice.)

It's a quick dessert, but it does need a little bit of love.  You need to make sure that you keep mixing! It not only aerates the dessert, making it soft and fluffy, but keeps the egg yolk silky rather than turning into bits of scrambled egg. The traditional method is a whisk and a lot of elbow grease, but we've gone modern and used an electric mixer.   The custard gets cooked over a bain marie (French for "water bath,"), gently heating the mixture.  One trick we read was to bring the water up to a full rolling boil, and then turn the heat down until bubbles barely break and the water is steaming.  This provides enough heat to cook the custard (aim for about 150°F) without getting scrambled edges.

This dessert should serve about 4-6 in dessert or demitasse cups

This dessert should serve about 4-6 in dessert or demitasse cups, but can be scaled easily, as long as you keep the same ratios.  (All bets are off if you tell your teenager, "Get some more glasses," and don't specify "dessert glasses...)


It's best served immediately, or it will begin to separate.  The thick foam atop syrupy coffee is still tasty, but not quite the same.  If you need to hold it for more than a few minutes, most of the recipes we've seen suggest folding in about 1/4 c whipped cream per recipe.

Espresso Zabaglione


4 egg yolks
1/4 cup sugar
1/4 cup espresso or strong brewed coffee, cooled to room temperature
bain marie - a pot with about 1 inch of simmering water


Place the egg yolks in a heatproof bowl that will nest just inside the top of the pot.


Beat the yolks on medium speed until they are smooth.

Slowly add the sugar, beating constantly in a figure-8 pattern, making sure to scrape the sides with the beaters/whisk.


Add the espresso (or wine), beating constantly.


Place the egg bowl on the pan.  Beat constantly until the custard is thick and fluffy, and an instant-read thermometer reaches 145-150°F.


Combine eggs, coffee and sugar until smooth and fluffy

Serve immediately with fresh berries (if you use large strawberries, quarter them first), biscotti or other crunchy cookies, some dark chocolate shavings...or just a spoon.  This dessert is so good, you may have a re-enactment of Oliver Twist.


©2012- 2016 Adventures with Jude. All rights reserved. All text, photographs, artwork, and other content may not be reproduced or transmitted in any form without the written consent of the author. http://adventureswithjude.com

Monday, April 4, 2016

Gluten and Nut Free Carrot Cake with Vegan Cream Cheese Frosting (V is for Vegetable)


Gluten and nut free carrot cake with vegan cream cheese frosting

Meg: When we were trying to decide what our letter V theme would be, Luke decided that we should go in a different direction.  V for vegetable make sense, but he saw this recipe a bit ago and thought "Wow, that's a carrot cake that actually looks appetizing.  It looked like I had food in front of me, not words on a screen."  I've seen some toothsome carrot cakes, but I see his point. Most are laden down with nuts and pineapple (neither of us can figure out that one) and look a wreck.  This one looked tender and spicy, but like cake, not a science experiment.  Plus, it looked simper to convert to gluten free since it was a basic batter cake.   Since Mama thinks that you can't mess things up too much if you slather cream cheese frosting on top, I said, "That works for me!  Want me to sous?"  He said yes, and promptly delegated the carrot shredding!  I should have known better...


Luke: I have only made a scratch cake once before. It was my great-grandmother’s pineapple upside down cake, and I was excited when it turned out. I was pretty hopeful I could make a carrot cake, but I was in need of a recipe. Unfortunately, the cookbooks we have lacked one that looked appetizing to me, so I looked online. Like my cookbooks, most had nuts and pineapple chunks in them. One, I’m allergic to nuts, and two -- who puts pineapple in carrot cake?! If I want pineapple cake, I’ll make Grammy Danks'recipe again!

I chose this recipe as my starting point because the directions were simple to follow along and looked easy to adapt for allergies. In fact, I hadn’t even started baking, and my mouth was watering from reading the recipe. With a few tweaks written to make it for our family, I headed into the kitchen.

The original recipe called for three 8-inch pans, which will make an impressively tall cake. Since we didn't have a third 8" round, I used one 8-inch pan and one 10-inch pan (the volume of batter needed for the 10 inch pan equals out to the same as two 8-inch ones) and stacked them as tiers.

And how come I wound up grating the carrots after all?

Simple Carrot Cake with Vegan Cream Cheese Frosting 


CARROT CAKE 

1 1/2 cups canola oil
1 cup granulated sugar
1 cup brown sugar
6 eggs
1 Tbsp. vanilla extract
3 1/4 cups King Arthur gluten-free flour
1 tsp Xanthan gum
1 Tbsp. ground cinnamon
2 tsp. baking soda
2 tsp. salt
1 tsp. baking powder
1/2 tsp. ground nutmeg
1 pinch of ground cloves
1 lb. finely-grated fresh carrots

plus ¼ c. each vegetable shortening and gluten free flour to prepare pans

FROSTING

 3 (8 oz.) containers Daiya cream cheese spread
1 cup vegetable shortening
1 Tbsp. vanilla extract
1/2 tsp. salt
6 cups powdered sugar

CAKE:

Preheat oven to 350°F.

Rinse and grate the carrots. Set them in a bowl to the side.


Prepare pans. (The originally recipe calls for 3 8-inch pans or 2 9-inch pans. We used 1 8-in and 1 10-in.) Be sure that the entire pan is well greased and coated in flour so that the cake does not stick!

In the bowl of a large stand mixer, mix together oil, granulated sugar, and brown sugar until combined and smooth. Add in the eggs one at a time, then the vanilla, and mix until smooth. 

Hint: If you crack the eggs into a separate bowl, it helps make sure there are no shells that will end up in your cake. Crack one egg into a bowl, check it, and then add to the mixing bowl. As it mixes in, repeat with the next egg.

Crack egg in seperate bowl to prevent shells

In a separate bowl, whisk together the remaining dry ingredients (flour, xanthan gum, cinnamon, baking soda, salt, baking powder, nutmeg and cloves) until combined.


Add the dry ingredient mixture to the mixing bowl, and beat on medium-speed until just combined, scraping down the pan at least once to be sure that everything is well mixed. Then fold in the grated carrots by hand, and stir until combined.


Pour the batter evenly into the prepared cake pans. Bake for 35-40 minutes or until a toothpick inserted in the middle of the cakes comes out clean.


Yes, I know the pies already cooling on the stove top look good. But they're another blog post for
later.

Let the cakes cool in the pans for about fifteen minutes. Gluten free baked goods need time to set after they come out of the oven, and turning them out of the pan too soon increases the risk of them cracking.


Remove pans and let them cool on a wire rack until the cakes reach room temperature.

Using a serrated knife, “torte” the cakes into layers. Fill the layers of cake with cream cheese frosting, reassemble the cake, and then frost the outside.


Serve that day, or cover and store in refrigerator for up to 4 days.

CREAM CHEESE FROSTING:

Using an electric mixer, cream together cream cheese and butter on medium speed for 1 minute or until smooth with no lumps remaining.

Add in vanilla extract and salt, and continue mixing until combined.

Lower speed to medium-low and gradually add in powdered sugar a cup at a time. (RESIST THE URGE to beat it on high and go faster. If you try, you and your kitchen will be covered in sugar.)


Once the sugar is mixed in, Increase speed to medium-high and beat until fluffy.


If frosting is too thick to spread, you can add in water, a teaspoon at a time. If it is too thin, you can add in more powdered sugar.If you kitchen is warm, cover the bowl and stick the frosting & beaters in the fridge to firm up a little, and re-whip until smooth when you’re ready to frost the cake.

Allergy friendly carrot cake


©2012- 2016 Adventures with Jude. All rights reserved. All text, photographs, artwork, and other content may not be reproduced or transmitted in any form without the written consent of the author. http://adventureswithjude.com

Monday, March 14, 2016

Topped with a Cherry (T is for Two Ways)

Topped with a Cherry (T is for Two Ways)

The original theme for this week's post was going to be "T is for Topping".  Luke and I made cherry topping to go on chocolate waffles, making them into "Black Forest Waffles."

Black forest waffles

And when I said to him, "Can you please write up the recipe, and I'll write the rest of the post?" he emailed me a copy of his half of the post.

I was confused, so I read it a couple more times.  And then I said, "Luke?  I'm not sure where this recipe is from, because it's NOT what we made."  His response was, "Oh.  Well, I'm hungry anyway, so want me to just make this, too?"

Why not?

So now you get the benefit of cherry topping, made two ways.  The first uses frozen cherries, the second one calls for dried fruit.  Either one is good on pancakes, waffles, or french toast...or just atop some ice cream.

Black Forest Waffles 


Chocolate Waffles

Ok, I cheated.  They were made from a box of cake batter.  King Arthur Gluten Free, to be exact. Make according to the box directions, and bake in a waffle iron instead of an oven.

Chocolate cake waffles


Ice Cream

Vanilla ice cream from the grocery store for the dairy-eaters here.  The non-dairy kiddos had homemade coconut ice cream.

Cherry Topping

 2 - 12 oz bags of cherries
1 c. powdered sugar
1 Tbsp vanilla
1 Tbsp cinnamon

Directions:

Take both bags of cherries out of the freezer.

Put  one bag of frozen cherries in a pot.  Top with the powdered sugar, and stir to coat the fruit.  (This helps the starch in the sugar disperse into the liquid to help thicken it.)


Bring the mixture to a rolling boil, and and the vanilla and cinnamon.

Continue to boil until the syrup reaches the soft-ball candy stage (235°).  (Let the 2nd bag sit out to defrost while the first cooks.)

Add the second bag, and cook until the cherries are warmed through.  (The uncooked cherries add acidity to brighten the flavor, thin the syrup a bit as they defrost,  and larger pieces of cherry to contrast with the first bag that is cooked down and thicken the sauce.)


Spoon over waffles and ice cream.  Refrigerate any leftovers to serve with more ice cream, waffles, yogurt, etc.


Cherry sauce


Cherry Fudge Sauce


This sauce will be thin when it's first ready, but will thicken as it cools.  It becomes very fudge-like when it's cold.  I keep the leftover in a Mason jar in the fridge, so I can run it under hot water to return to a pourable consistency.

½ cup dried cherries
8 tablespoons Earth Balance Margarine
½ cup Enjoy Life mini chips
½ cup So Delicious coconut milk beverage
1 ½ cups powdered sugar
1 ½ tsp vanilla

Directions:

Place the cherries in a small bowl. Cover with hot tap water, and microwave on high for approximately 30 seconds. Let them stand in the microwave while you prepare the sauce.


In a large saucepan, melt butter and chocolate pieces over medium-low heat, stirring constantly.


Whisk in the powdered sugar.  The mixture will get very thick - almost gloppy.


Add milk and vanilla, and whisk until smooth.


Once the chocolate is smooth, remove cherries from the microwave. Pour off the soaking liquid from the bowl, and gently press the cherries to remove any excess liquid (use the back of a spoon or your hands). Add the cherries to the chocolate sauce.

Serve over French toast, waffles, ice cream...you get the idea.

Cherry Fudge topping french toast


©2012- 2016 Adventures with Jude. All rights reserved. All text, photographs, artwork, and other content may not be reproduced or transmitted in any form without the written consent of the author. http://adventureswithjude.com

Monday, February 29, 2016

Classic Braised Beef (R is for Roast)


Braising can make a spectacular company meal or a hearty family dinner with little culinary skill required. Braising is one of the easiest ways to cook a large cut of meat, and can make a tough cut of meat incredibly tender.  This technique combines both dry and moist heat. On the dry side, the meat is first sautéd in a Dutch oven to help develop a deep flavor. Then a flavorful liquid is added, a lid popped on top, and the moist heat from simmering gently cooks the food. The long, slow cooking allows the flavors of the different ingredients to combine, and turns even the toughest, most inexpensive cut of meat as tender as a filet steak.

There are a lot of steps listed, I know, but this truly is meal is simple to make.  The steps are often quick, but it's important to assemble your dish in an orderly fashion.   The three major steps involved in making this dish:

1. Don’t lose track of time, but you can walk away.

 Once the braise is in the oven, you don’t really need to babysit it. You may want to periodically baste the meat and keep an eye on the time so you don’t forget to add the vegetables, but there’s no need to hover over the stove.

2. Be patient waiting for dinner. 

While the braise cooks, as the aroma will leave your mouth watering and your stomach growling.  Eat a leftover carrot -- you'll feel like you were "good" and deserve extra potatoes.

3. Make sure you use the right amount of liquid.

Too much and your gravy will be thin and you’ll have more work at the end; too little and you won’t have enough gravy to pour over your mashed potatoes!

PS: Don’t worry if you have a smaller family - this is almost better as leftovers! 

Classic Beef Pot Roast with Mashed Potatoes - serves 8-12  


Rustic Pot Roast Ingredients
 4 lbs chuck roast (this is the “meat weight” - if your meat has a bone in it, you’ll want a 5-6 pound roast)
2 tbsp canola oil
about ¼ c. each kosher salt and black pepper
1 large onion
5-6 garlic cloves
2 tbsp Tomato paste
½ cup red wine (to deglaze pot) + 1 Tbsp red wine to finish gravy*1
 4 c. beef stock

1 lb carrots
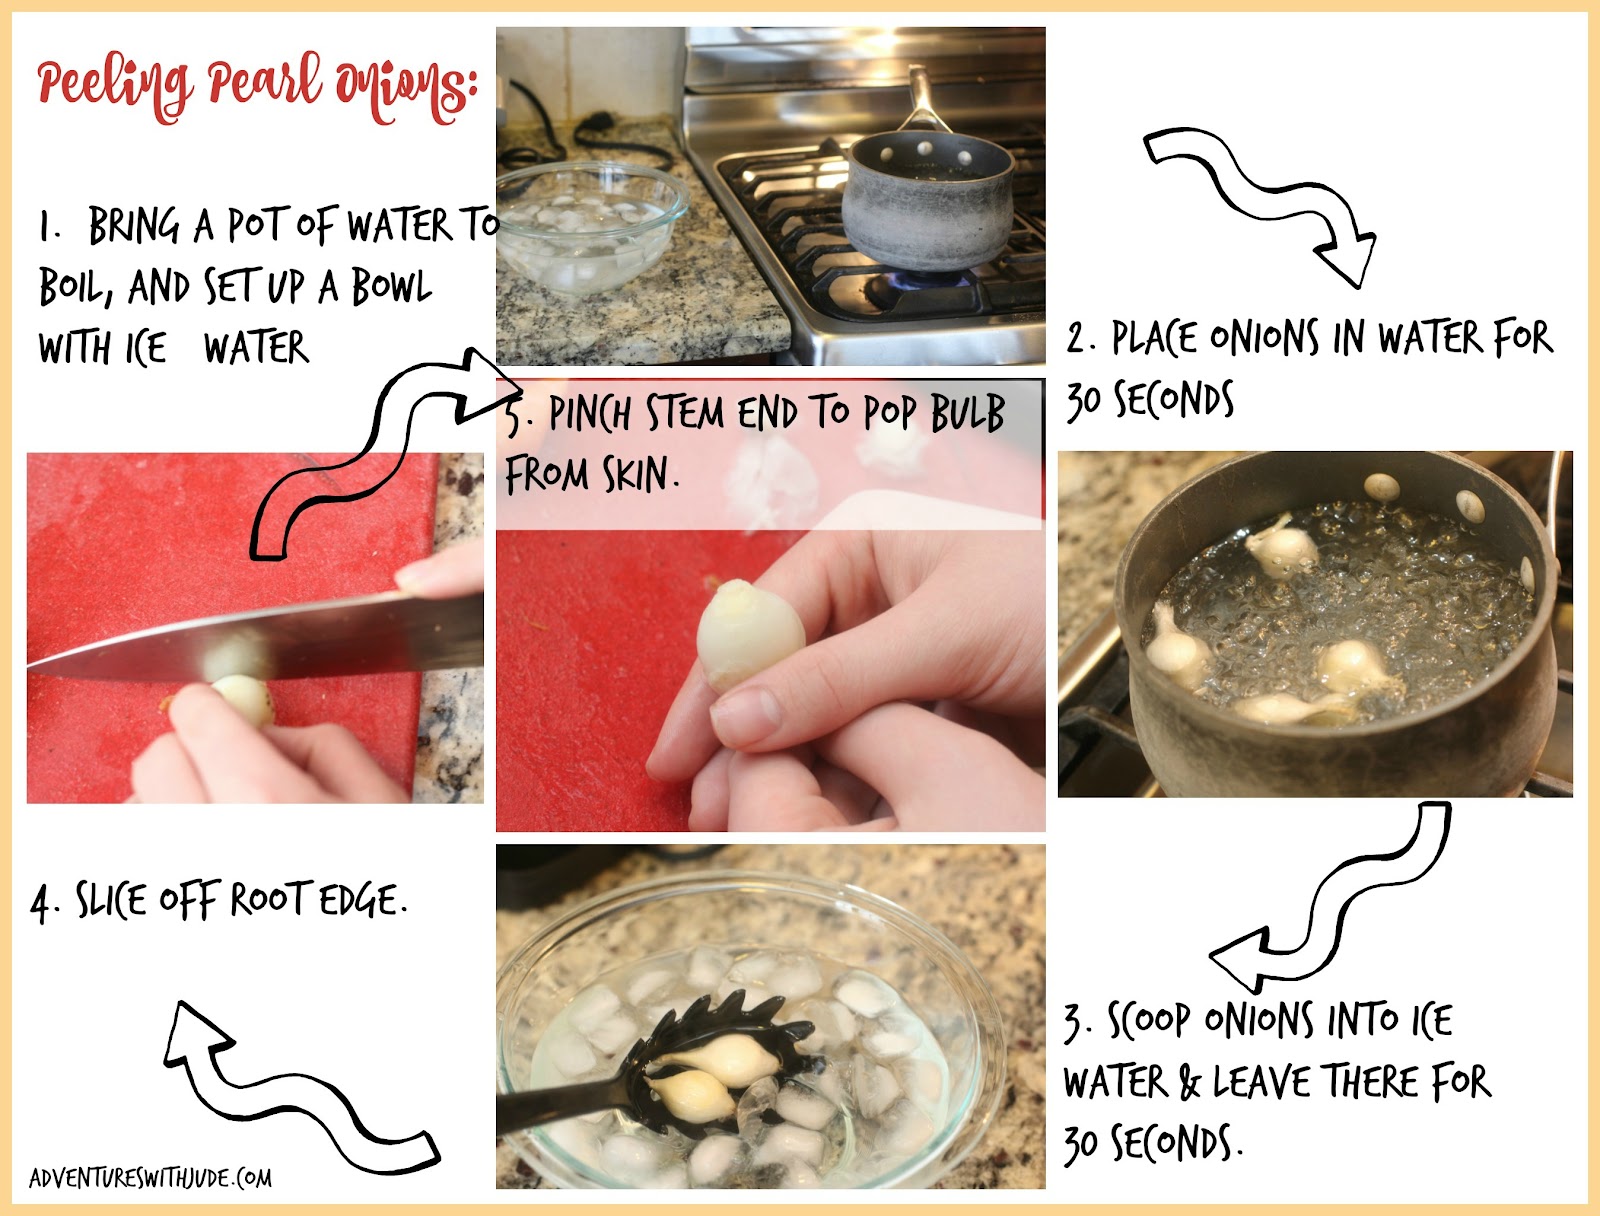
1 lb pearl onions, peeled
1 tsp thyme
2 bay leaves

 *1 note: If you prefer not to use wine, use an extra 1/2 cup of broth or water plus 1 tbsp or so of lemon juice for finishing.

Mashed Potatoes Ingredients
3 lbs russet potatoes
½ cup So Delicious unsweetened coconut milk beverage
1 tub Daiya cream plain cream cheese spread
2 tsp kosher salt
2 tsp black pepper
2 tsp garlic powder

Directions:

1.  Peel and mince the onion and garlic cloves. Put each in a small bowl and set aside for later use.

2.  Preheat your oven to 350ºF, as well as a large dutch oven or stockpot over medium heat.

3.  While your pan is preheating, season your beef with salt and pepper.

4.  Add the canola oil to the hot pan, and watch for the oil to faintly smoke. Immediately, add the beef to the pot. Brown the roast for about 3 minutes on each side.


Once all sides of the beef have been browned, remove the roast from the pan. (You can put it in a bowl so any juices don’t drip, but I just invert the pot lid and place it on there. Why wash another dish?)

5.  Add the diced onion to the pot. Saute the onion until it turns caramelizes (soft, translucent and golden).

6.  Add garlic cloves saute for one minute.

7.  Add tomato paste and stir to combine with other vegetables. Sauté until the bright red of the tomato paste has turned to a darker brick red. (Don’t worry if you have browned bits stuck to the pan. This is called “fond”, and is a good thing.)

8.  Carefully add a ½ cup of red wine to deglaze the pot. Scrape the bottom of the pot to incorporate the fond.

9.  Put the meat back in the pot, and add approximately 4 cups beef stock *2, as well as the thyme and bay leaves.

*2 note:  You may need a bit more broth, depending on the size of your pot - you want the liquid to come about halfway up the meat. Don’t skimp if your pot is smaller, because the liquid will concentrate during cooking and you won’t have enough gravy.

10.  Place the lid on your pot, and cook it in the oven for 2 hours. Turn the roast over approximately every half hour.

11.  While the meat is cooking, peel and quarter your potatoes and place in a pot. Add COLD water until it covers the potatoes by about 1 inch.

12.  Prep the pearl onions, and oblique cut the carrots into large (approx. 2 inch) pieces.  Now, you can walk away for about 1 1/2 hours.  Just set a timer so you can come back to flip the roast. If you don't, it's OK, but make sure you set a timer so you don't miss the next step -- or else dinner will be late.


13.  After about 1 ½ hours, add your carrots to the Dutch oven. Turn the potatoes on and bring to a boil. 

14.  After another 15 minutes (the 1 hr 45 min mark from starting), add the pearl onions to the Dutch oven. Stir to submerge them. Check the potatoes - when they are tender (a paring knife slip easily into a chunk), drain into a colander. 

15.  Put the potatoes into a large bowl with the milk and mash. Add the cream cheese, salt, pepper, and garlic, and combine until there are no puddles of milk or lumps of cream cheese. (The potatoes themselves will not be perfectly smooth - remember, this is a rustic meal.)  Transfer to a serving bowl and cover with to keep warm.

16. After the carrots have been in for half an hour, check that they are done.  They should be tender but not mushy when probed with a paring knife.  (If they are really large, they might take a few more minutes.

17.  Remove the pot from oven and place over low heat. 

18.  Remove the beef to a cutting board, and cover to keep warm. Using a slotted spoon, transfer the onions and carrots to a serving bowl and cover as well. 


19.  Turn up the burner to medium heat. Skim off any fat from the liquid, and remove the bay leaves. Bring the braising liquid to a low boil, and simmer until reduced by about half, about 10 minutes - just enough time for your meat to rest.

20.   Add the last tbsp of wine (or lemon juice) to finish the gravy. Carve the beef and serve alongside potatoes and veggies. Ladle gravy over the meat and potatoes. 


 ©2012- 2016 Adventures with Jude. All rights reserved. All text, photographs, artwork, and other content may not be reproduced or transmitted in any form without the written consent of the author. http://adventureswithjude.com

Monday, February 22, 2016

Quiche ala Luke: Real Men Make Quiche

gluten free dairy free sausage, onion and pepper quiche

Although quiche is now considered a classic dish from  French cuisine, quiche actually originated in Germany. The medieval kingdom of Lothringen was originally under German rule; after the French conquered the area, they renamed it Lorraine. The word quiche is derived from the German ‘Kuchen’, meaning cake. The original ‘quiche Lorraine’ was an open pie with a filling consisting of an egg and cream custard poured over smoked bacon. The bottom crust was originally made from bread dough, but that practice evolved into the use a short-crust or puff pastry crust. Later on, cheese was added to the quiche Lorraine, and this cheese-filled version persists into today’s cuisine. Another popular version, Quiche Alsacienne, is basically Quiche Lorraine plus onions, while Quiche Florentine adds spinach to the filling. Quiche can be served as an entrée any meal. It is a popular café lunch and light supper,  served at room temperature with a small green salad on the side.

Quiche became popular in the U.S. during the 1950's, especially at a ladies’ luncheon. It was simple to make, could be served at room temperature, and with its salad accompaniment, was considered a “light” meal. Over time, it became a way to fancy up another 1950s staple: the casserole. Today, one can find many varieties of quiche; while any coordinating meats and vegetables can be put into quiche, popular fillings are broccoli, mushrooms, ham and seafood (primarily shellfish). Because of it’s popularity at the ladies’ luncheons, it became considered a somehow ‘unmanly’ dish, and a popular phrase was coined - “real men don’t eat quiche.” However, real men not only eat quiche, but they also make quiche.

This is a hearty quiche, perfect for a real man (or lady). It returns to its bread dough roots with a gluten-free hand-pressed biscuit crust that gets pressed into a casserole dish - no fussy short crust to mess with. The dairy-free custard tops sausage, caramelized onions, and sauteed red peppers. Based on how many males there are in our house, and how fast the pan emptied, I would definitely say real men eat this quiche.


Quiche ala Luke

Filling: 

3/4 lbs. Italian sausage
1 medium onion, julienned
1 medium red pepper
olive oil, as necessary

8 eggs
3/4 cup coconut milk beverage (So Delicious)
1 Tbsp garlic powder
2 Tsp basil
2 Tsp oregano

Crust: 
2 eggs
4 cups  biscuit mix  (Gluten Free Bisquick is what we used)
1 to 1 1/4 cups water
Approx 2 Tbsp cooking oil (to grease the pan; we used canola oil)


Phase 1: Preparing the filling 

1. Line a baking sheet with aluminum foil. Set aside. As each ingredient for the filling is prepared, set them on the sheet for cooling (if you put hot ingredients in with the eggs, they will start to cook prematurely).

2. Preheat a large frying pan over medium heat. While it is preheating, remove the sausage from its casing (skip this part if using bulk sausage).

3.  Add some olive oil to the pan, and add the onion.  Saute until the onion is soft and caramelized. Spread it onto the baking sheet to cool, and set aside.


4. Saute the red pepper (adding oil to the pan if necessary), until softened and charred. Add to baking sheet.


5. Saute the sausage, breaking it into small chunks as it browns. Add to baking sheet.


6. Once the onion, pepper, and sausages have cooled to room temperature, combine the eggs, milk, and spices into a blender and mix until smooth. Set this aside while you make the crust.

Phase 2: The Crust 

1. Grease a 9x13 pan with the oil. (I found this is accomplished easiest just using your hand to smear it around.)  Be sure to coat all the way up the side and in any corners, or else you will be chipping crust  off your pan.


2. In a small bowl, whisk together the eggs and biscuit mix.  Add water until it forms a soft dough.  (You want it to be soft enough to press into the pan, but not so wet that it sticks to your hands.)

3. Press the dough into the greased pan, making sure to push it into the edges and up the sides.  While you want the crust thin, be sure that there are not any holes for the filling to seep into.


Phase 3: The Quiche

1. Add the cooled onion, red pepper, and sausage crust, spreading evenly.

2. Add the egg mixture in to fill up the remaining space. Fill it until it is just below the top of the crust edge.


4. Bake for 45-60 minutes in a 350ºF oven.  Check it at 45 minutes, and then every 5 minutes therafter.   A paring knife inserted into the center should come out moist by clean.


Allow the quiche to cool about 10-15 minutes before serving.  It should be warm, but not piping hot.  Serve by itself, or with a salad.  Leftovers can be placed in a warm oven until the chill has been taken off - about 5-8 minutes at 300°F.


Real men make and eat quiche! 


©2012- 2016 Adventures with Jude. All rights reserved. All text, photographs, artwork, and other content may not be reproduced or transmitted in any form without the written consent of the author. http://adventureswithjude.com
Related Posts Plugin for WordPress, Blogger...
Pin It button on image hover