Showing posts with label cooking. Show all posts

Tuesday, January 31, 2017

Strawberry Marshmallow Poppers

Before Jude started adventuring, I had a "family" blog.  It was back when Facebook was for just college students, and a blog was a good way to simultaneously update lots of family members about the kids, without worrying who I forgot to tell a story to and who I was boring with the ninth rendition of the same story.   As I read back over some old postings, I saw these treats.  Of course, Celia was reading over my shoulder, so now she wants me to make them again.  I'm so grateful for how far we've come -- when I first shared this post, she only had two safe foods, and now she's up to ten! This is one of her latest creations -- bacon sandwiched between oatmeal banana pancakes slathered with sunflower seed butter.  We've been calling it the "Allergic Elvis."


I think one of most wearing parts of being the parent of a food-allergic kid (POFAK, for short), is constantly feeling like I'm in the kitchen.  There are a lot of great ready-to-eat options out there if you're only dealing with one or two allergens.  For example, Luke can't have peanuts, Neal can't eat anything with gluten,  and I can't have shellfish or wheat.  They're common allergies, and while they may cross things off the list to eat, trust me, the padding on my rear end isn't suffering any!! As we go through the family, the product list gets smaller; avoiding milk AND soy AND nuts knocks a lot of things out for Jude and Matthew.  And then we get to Celia and Damien, whose "can have" list fits on the back of a business card.  We've slowly added a few pre-packaged foods, but for the most part, if we want to eat, somebody has to be in the kitchen.  Needing to work around food allergies is a major reason why I am insisting that the kids take cooking courses as they get older.  Not just "learn to cook a recipe," but learn the science of cooking so they can take apart and rebuild recipes, and technique to skillfully change up a dish's presentation.  Sometimes the difference between "This again???" and "Wow, that looks interesting!" is cutting a sweet potato into matchstick julienne instead of cubes.

With food allergies, sometimes the hard part is making feeling "normal," and having food that doesn't LOOK like it's "allergy food."  Many of us joke that it's like spinning gold out of straw...or sometimes, spinning gold out of thin air!  Parties can be hard for food-allergic kids.  They want treats, too!  For Celia's birthdays, we've had cakes made out of cotton candy, and even a marshmallow molded into an Olaf. Back when we only had two foods to work with, I was making a fruit tray with dip for a Christmas party, and she wanted to know if I could make strawberries with "her kind" of dip.

Uh...ok.

So me and my buddy Google got down to business. Most marshmallow fluff recipes call for eggs. They are something she has "normal" allergies to -- they can trigger anaphylaxis and kill her.  Not gonna work.  Searching for "Vegan Marshmallow Fluff" (inherently egg free) got lots of ideas, but all containing foods she can't have, especially soy.  That "only" triggers GI bleeding...yeah, I think we'll skip that too.  I was starting to give up hope.  One last search and I was going to have to tell her that she might have to choose one or the other.   I entered "Egg Free Marshmallow Fluff recipe" and found this.  It wasn't "fluff" -- it was a whoopie pie filling.  But it was a workable recipe.  Cue the choir of Christmas angels!

I started subbing foods in my head as I read the ingredient list.  Gelatin -- Pork-based gelatin (Knox brand) is safe for us.  Water, check.  Maple syrup...not safe, but we can use Lyle's Golden Syrup instead.  Vanilla isn't a safe flavoring, but plain rum is, as is Crystal Diamond Kosher salt.  We could make this work.  (Or destroy the kitchen trying.)

Faux Fluff:


1 envelope gelatin
1/4 cup water

Mix together and microwave for 30 seconds.  Pour to mixer bowl.  Add:

1/2 c. golden syrup
1/2 tsp rum
1/4 tsp salt

Start mixing.  Mix on high speed for 10-12 minutes to create the marshmallow.


After 2-3 minutes, you can see the sugar turning fluffy.


By golly...after 12 minutes, we have a soft marshmallow-type thing going.  This may work after all!  (The difference between this and "regular" marshmallows is stopping while the marshmallow is still warm and soft -- think the difference between soft and firm peaks with either whipping cream or egg whites.)


Celia came wandering in at this point.  She decided it needed inspection by a "Quality Control" officer.  She deemed it "perfect."


Ok, now for the real test. Everybody's seen the whipped cream-and-strawberry Santas making the rounds on Pinterest.  Could I make THOSE happen??  I scooped some of our wannabe fluff into a zip-top bag, snipped the corner, and started filling cored strawberries.  (Cut the green/tops off a strawberry, slice of a little bottom so they stand up, and core out a little of the berry to stuff with fluff.  If you're making Santas, use the lopped-off point for your hat.  If you're not, put them in a bowl and snack.)


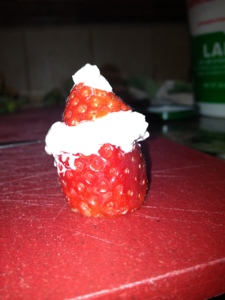
Verdict: they sort of are possible.  I think if I was filling them and serving immediately, yes the Santa-hat-option would work.  But the few test ones I made started to have the tops slip-siding after an hour in the fridge -- I think between from the marshmallow setting in the cold and the sugar in the fluff, it was almost macerating the berries from the inside,  I didn't think they'd hold overnight.  In the end, I made filled strawberries, they just didn't have caps on them.  Celia was good with that, and they held up fine as "Strawberry Poppers".

She decided she wanted to fill a couple.


 And decorate the sides. The more marshmallow, the merrier!


And eat them on the spot, of course.


See that face stuffed full of a special treat?  Yeah, it's worth the work.  Rumpelstiltskin ain't got NOTHING on a POFAK.


©2012- 2016 Adventures with Jude. All rights reserved. All text, photographs, artwork, and other content may not be reproduced or transmitted in any form without the written consent of the author. http://adventureswithjude.com

Tuesday, October 11, 2016

MyFreezEasy (A Homeschool Review Crew Review)

When Luke began his Junior year of high school, he decided to take a cooking course.  He's a master sandwich maker, but even he conceded that even a grilled cheese sandwich wasn't really a "hot dinner."  He became very proficient in the kitchen, trying old favorites and branching out to adapt new recipes.  By now I can say, "I'm busy doing schoolwork with the others.  There are pork chops in the fridge, do something with them," and an hour or so later, dinner is on the table.   Matthew has watched Luke in the kitchen and has been itching for his turn, so when we received a MyFreezEasy.com Meal Plan Membership from MyFreezEasy, he suited up in the kitchen and was ready to cook.


Easy there, cowboy!  Let's find something to make first.


MyFreezEasy is a subscription service that creates meal plans for busy families.  In it's strictest sense, you can create meals that fill your freezer in one bulk session, and cooking becomes "grab a bag and go" plan.  Meals are divided by cooking style (slow cooker, skillet, etc.), by ingredient (ground beef vs. other cuts of beef, pork chops vs. chicken, etc.), and even allergy accommodations (gluten free, dairy free, etc.).  Below is a sample of the "ground meat" category:


Each month, MyFreezEasy releases eight pre-organized meal plans that include recipes and shopping lists planned around a particular style of cooking or food, as well as a Build Your Own Meal Plan option. Having them organized by protein is a good idea for if you are thinking "Chicken is on sale this week," or "I have some ground beef to use up, but I'm not sure what I want to do with it."  It's also nice that you're not flipping through skillet pork chop recipes when you know you want something for the slow cooker.   You can swap out another dish from same pre-made plan genre (ie, chicken, ground beef, etc.)  if the pre-planned list has something that won't work for you.  However, since I knew I wanted to try several different types of recipes  before committing to a freezer full of them, we chose to mostly work within the BYO version.  Among the things we made were Chicken Parmesan, Slow Cooker Beef and Black Bean Chili, Peachy Pork Chops, and Stuffed Peppers.


One thing I appreciated is the recipe measurements are usually generous.  We generally doubled the ingredients and still had leftovers! That's something that rarely happens with recipes served to teen boys! I appreciated having a night off in the kitchen when we ate them up!  The one time we didn't have much left was when we made Chicken Asado -- my chicken pieces were on the smaller side and didn't go as far.

I was skeptical when we first started this because we're not a "bulk cooking family."  Even when I can tomatoes in the summer, I put them up plain, preferring to flavor them based on what we're eating when I open the jars rather than winding up having six jars of salsa and no pasta sauce!   Much of our meat is bought in bulk -- every few months, we contract with a local butcher for a whole pig, a bulk order of chicken, etc. We receive it frozen, so it's pointless to defrost and re-freeze it just so it's in the "right" zip-top bag.  I also was a little confused with why it would be worth the freezer space for some of the meal.  One example is the chili we made. It certainly makes sense to brown the ground meat and freeze that, so it's ready to go, and I can certainly get on board with freezing prepared chili, but it didn't make sense to me to open cans into plastic bags.  It's more storage-space-efficient for me just to open everything directly into the crock pot when I'm making dinner. For the pork chops, based on the freezer directions, it made more sense to me to take pork chops and already-frozen (and unless it's early July, generally less expensive that fresh) out of the freezer on the night I was ready to cook.

(c) MyFreezEasy
MyFreezEasy meals are very easy to prep. Directions are well written, so I can hand a beginner cook like Matthew a printout and say "go make this."  There have been a few things he's needed help with, like learning how to pit peaches and the "wet hand/dry hand" technique for breading chicken.  He would have been able to make the chili completely on his own, but apparently, the pop top on the first black bean can fought back. (We had to fall back and re-engage with a "use the can opener" strategy.)  After seeing what Luke has made over the past two years, I know Matthew was a bit nervous that his meals would be as well received.  These were simple to make, helping him build his confidence in the kitchen.

Most of the recipes are reasonably flexible, which is good for a new cook.  For example, the stuffed pepper mix called for "ground beef."  Since we had some Italian sausage in the fridge,  we used that instead.  Matthew learned that a cooking recipe is a guide, and generally as long as you're substituting something similar, you can adjust recipes and make them your own. (Since sausage is really seasoned ground pork, so it works while a steak would not be a good choice even though it's still beef.)  We also made the Chicken Asado recipe, up through marinating the chicken, and then grilled it instead of baking.  (I didn't get a picture of that one -- it disappeared too quickly!)

In almost every recipe, we adjusted the spice content -- my only real complaint is they recipes overall are very mild.  We followed the pork chop recipe precisely, and found the flavor was good but little flat; next time we make it, we'll add a bit more ginger and maybe some allspice.  I knew looking at the chili recipe that one teaspoon of garlic powder was not going to be enough for our family, so I stepped in and taught him how to pour ground spices into his hand to measure.  He learned sometimes you DO need to measure carefully -- we were out of chili powder and had to make more, and in that scenario, measuring is necessary to keep the proportions even -- and other times, you can measure with the "eh...looks close enough" method.


One thing I wasn't impressed with was the allergy flagging.  I admit, I am pretty biased on this one because I've been working around allergies for ten years now, and as I read recipes, I just swap ingredients in my mind.  Many of the recipes were inherently free of the top 8 allergens, but sometimes recipes in the "gluten free" category were notes like "use gluten free bread crumbs," or "serve with gluten free sides." Several of the recipes were dairy based and said, "Unfortunately, there's not a good way to do this dairy free."  This is from the stuffed pepper recipe.


However,  lasagna can easily be made dairy free using dairy-free cheese substitutes, and we made the peppers using a vegan cheese.  Even the "parmesan cheese" topping on our chicken rendition was dairy free (you should have seen the happy dance I did in the grocery aisle when I found it -- this recipe gave me a reason to use it!)  Yes, in some dishes it can be omitted, and I wouldn't expect her to know every brand, but I wish there was a little more effort put into the allergy offerings than just "choose gluten free sides" or "skip this item/recipe."   There were several recipes that Matthew read at face value and was disappointed until I pointed out how we could work around them.

We are enjoying our subscription to MyFreezEasy.  There is a good variation -- the menu lineups change each month, with some new recipes added and others retired, so there is something new to choose from as well as favorites.   Because of how we grocery shop, I don't see us making many recipes to fill the freezer, but the "from the freezer" direcitons to the recipes will be a good guide for what Matthew needs to take out and defrost for his turns cooking dinner.

For more about MyFreezEasy, follow them on social media or click the banner below to read others' reviews.

Facebook: http://www.facebook.com/freezeasy
Instagram: http://www.instagram.com/freezeasy
Pinterest: http://www.pinterest.com/5dollardinners/freezeasy


MyFreezEasy.com Freezer Meal Plan Membership {MyFreezEasy}


Crew Disclaimer


©2012- 2016 Adventures with Jude. All rights reserved. All text, photographs, artwork, and other content may not be reproduced or transmitted in any form without the written consent of the author. http://adventureswithjude.com

Thursday, January 28, 2016

Tap My Trees (A Schoolhouse Crew Review)

Small Batch Maple Sugaring with Tap My Trees

Tap My Trees  is a company started by Joe McHale.  He was interested in teaching his children the origins of their food -- and that it wasn't the local megamart!  However, he didn't want to just tell them about where their food comes from, he wanted to show them.  The problem he found was that most maple sugaring suppliers are large scale operations.  After all, it takes 40 gallons of sap to make one gallon of maple syrup, so tappers are purchasing supplies in large scale quantities. He still wanted to share the process with his children, even if they were only going to wind up with enough syrup for a few breakfasts.   He realized he couldn't be the only person wanting to try his hand at sugaring, and found himself the owner of an agricultural supply start-up!  His Maple Sugaring Starter Kit with Aluminum Buckets contains supplies for tapping up to three trees, and a book about identifying trees, tapping, and creating syrup, making it perfect for the family who wants a taste of sugaring.

Coincidentally, about three days before the Crew announced this review, the kids were asking if we could make our own syrup.  I am a child of the 80s, and in our house, pancake topping came from a bottle with a house or a lady with a kerchief on the front.  It was maple flavored,  we drowned pancakes and toaster waffles alike in it, and we called it good.  I can't complain.  Because of food allergies, we switched to "real" maple syrup when the big boys were young, and now only use that.  (Yes, we're spoiled now.)   Making our own seemed like it could be fun.   When we built our house, Neal knew he wanted lots of trees; as much as I love nature, I can't say I had a strong opinion.  When he decided he wanted to line our driveway with 20-some Fall Fiesta Sugar Maples, and put more in the yard, I just nodded and said, "Whatever you want!"


 So we had maple trees, and kids who wanted to tap them.  We just needed tapping supplies.

When this review came up for assignment, one requirement was that we live in a sugaring area.  Southern New Jersey is probably on the very edge -- though other maples are, sugar maples are not native to our area.

This is one of several "where to find this tree" maps in the guidebook.
Score one for Daddy, thinking ahead and planting sugar maples! We mapped out our trees and anxiously awaited our sugaring kit.  (Two notes: 1 -  it's much easier to map your trees before they lose their leaves in the fall, especially if you haven't planted them yourself, and 2 - while you can tap other species of maple,  birch and walnut trees will also run sap that can be made into syrup.)

Tap My Trees Review
We received our kit and dug in.  It contained three aluminum buckets, hooks, and lids, a drill bit, spiles, cheesecloth for filtering collected sap, and a paperback manual. You really don't need much more than these in terms of "special equipment" to get started, but you'll need "from home" a measuring tape, a drill to bore your tap holes, and pots to boil your collected sap in.  Step-by-step directions tell you how to prepare for the sugaring season, and then how to get underway and collect sap. Instructions are also included for how to remove your spiles and shut down after the sap finishes running for the year - very important if you don't want to harm your tree.

The manual also includes directions on how to tell when it's time to tap.  Generally speaking, tapping time is February or early March, but it all depends on the winter.  Ideal conditions are when the daytime temps are around 40°F and lows are in the 20s, but depending on the weather patterns, it might be a bit of a moving target.  You'll need to consult with an almanac or weather website for what's "average" for this pattern in your area.  In NJ, the average temperatures are in this range in January, but this this winter was pretty warm until about two weeks ago, with lows averaging in the 40s.  If you're farther north, your season might be a little later, but then again,  last year, we had highs in the single digits through February, so the season wouldn't have really started until closer to March here, either.   I like how it stresses you have to watch the weather, not the calendar.  If you're a little off, it's OK, but it doesn't tell you, "Start tapping on this day," and then your kids are disappointed nothing happens (especially if it's "too early" for the year).

If you're reading this and thinking, we have trees, but the temperatures are already in the right zone for this year, either use their store locator and hotfoot it to a brick-and-mortar store where Tap My Trees is a sugaring supplier, or go ahead and order it from their web store  (at the time of this writing, free shipping is standard!) and get started.  A late start means you may not get quite as much sap collected, but you should still be able to make some syrup. (If you're reading this and it's out of tapping season, purchase it anyway, and store it until the season begins for next year, knowing you can really "start" in the summer/fall with the mapping.)

I think that the most important thing you have to do to make this work is make sure your trees are big enough to tap. A tree needs to be at least twelve inches in diameter to safely tap.  Before you purchase this, go out and physically measure your trees.  Measure the circumference at about 54" from the ground and divide by 3.14 to find the diameter. If you don't have a tape measure but know approximately when they were planted, you can estimate your tree's size, using this table and the age of your trees. The diameter in inches x growth factor = tree age, so with a little algebra,  a 10 year old sugar maple tree = 5.5 x diameter, or approximately 2".  A mature, 12" tree will be in the vicinity of 60 years old, so if they're recently been planted (recently being "not by your grandparents"), odds are good the tree is going to be too small to safely tap. Unfortunately for us, that means we'll have to take to our woods with a tape measure in search of some mature trees, and leave Daddy's trees alone, even though the oldest ones are a still-respectable 15 to 20 years old.

The rest of the hardware in the kit is sturdy, and with proper care, will last through many seasons of sugaring.  The pails and lids (and spiles) are sturdy enough that they will last being outside for a month or two at a time, but are lightweight enough that you'll be able to carry one that's been filled with sap.


I think this is a great activity for families.  We will boil down some "homemade sap" (sugar and water) to mimic making syrup, but it would have been really neat to make our own maple syrup for breakfast.  It takes a lot of work to get food from its source to the table, and this kit would do a great job of demonstrating that the dreaded chore of slogging to the megamart really is the "easy" part!

To learn more about Tap My Trees and their sugaring kits, click the banner below to read other reviews, or follow Tap My Trees on social media:

Facebook: https://www.facebook.com/TapMyTrees/

Twitter: https://twitter.com/tapmytrees

Instagram: https://www.instagram.com/tapmytrees/ 

Pinterest: https://www.pinterest.com/tapmytrees0518/ 

YouTube Channel: https://www.youtube.com/channel/UCB6yQre-XsOl6bo6dO-K5Xw
 

Tap My Trees Review


©2012- 2016 Adventures with Jude. All rights reserved. All text, photographs, artwork, and other content may not be reproduced or transmitted in any form without the written consent of the author. http://adventureswithjude.com

Monday, January 18, 2016

Dairy and Soy Free Lemon Cheesecake Mousse (L is for Lemon)


no bake dairy and soy free lemon cheesecake

For several years now, I have been  trying to get a more traditional cheesecake recipe to work with dairy- and soy-free cream cheese, but it wasn't working.  We recently tried a vegan no-bake cheesecake recipe, and suddenly, my mine raced with possibilities. No-bake cheesecake isn't exactly the same as a New York style cheesecake, but it's still delicious.  Plus, it's ready almost immediately, rather than hours later. I'm always on the hunt for quick desserts, so my math says fast + cheesecake = perfect.

After lots of googling and comparing recipes, I came up with this lemon-flavored one.  You certainly could put it into a crust (I like using Enjoy Life soft cookies as a press-in-the-pan crust), but I decided to serve this one in dessert glasses, making the lemony mousse the star of the show.  To serve, I topped with a bit of lemon zest, but you could use cookie crumbs or even fresh berries.  Best of all, this dessert is ready as soon as it has been put together, so it's perfect for last-minute dinner guests -- or just when you're craving some cheesecake!

Lemon Cheesecake Mousse


1 package Daiya cream cheese (8 oz)
1 can sweetened condensed coconut milk
1/2 cup lemon juice, divided
1 packet unflavored gelatin*

Whip the cream cheese until smooth and fluffy.  Add in the sweetened condensed milk and continue whipping on high for 3 minutes.


 Place about 1/4 cup of lemon juice in a bowl.  Stir in the gelatin.  Heat the other 1/4 in the microwave until hot (slightly steaming), about one minute.


Add the hot juice to the gelatin mixture, and stir with either a whisk or fork until liquefied and smooth.  Slowly this to the cream cheese mix, and beat until fully incorporated.

Spoon into dessert glasses (or a prepared pie crust for a traditional cheesecake).  Top with lemon zest (or fresh berries, or mini chocolate chips...) It can be served immediately, or stored covered in the refrigerator.

no bake dairy and soy free lemon cheesecake


 *Note: Gelatin can be omitted to make a vegan mousse, but the texture may not remain as fluffy.  Add the cold juice to the whipped cream cheese and milk mixture in the same order. 


©2012- 2016 Adventures with Jude. All rights reserved. All text, photographs, artwork, and other content may not be reproduced or transmitted in any form without the written consent of the author. http://adventureswithjude.com

Monday, January 11, 2016

Cooking on the Road (K is for Kitchen Gear)


We've been on vacation, so I'll start out by saying we didn't really do any recipe development this week.  About as exciting as it got was coating chicken in crushed potato chips to use them up.  (Hey, Damien was impressed!)  Instead, this week, I'm sharing our list of favorite kitchen supplies for when we're on vacation.  With our allergy-restricted diets, it's usually easier to pack food. 

Two summers ago, Luke shared his packing list for big multi-day field trip.  We were only gone for a few days, so we were able to organize everything in our large cooler.  Last summer, we spent 26 days zig-zagging around the country, and had to pack not just for eating, but cooking.  (In addition to allergies, we spent a lot of time literally on the road driving places, so being able to just make up a quick meal in the hotel room when we finally settled in for the evening was a big deal.)  We started our trip with a new cooler - hubby's gift to me for my birthday.


This is probably the best cooler we've ever used.  It plugs into the car - keeping the food cool without filling the cooler with ice - but also into the hotel room wall, so we didn't have to unpack and re-pack it all the time.  (It also is great for grocery shopping!)  It fits several days' worth of cold food, and combined with a large bag of dry goods, we can pack enough food to feed 6 people for almost a week!

Our "Kitchen Bag" is our other must-have item.


It contains items dedicated to road trip, and lives on a shelf in the garage, so it's ready to go when we are.  Whether we have a full-kitchen, or just a microwave, it goes with us.  (You'd be surprised how skimpily "full amenity" kitchens are furnished!) The bag's current contents include:

-a baking sheet
-a 9x13 baking pan
-a collapsible colander
-large plastic container (it doubles as a mixing bowl)
-zip-top bag with basic spices: salt, pepper, garlic powder, apple pie spice
-aluminum foil (we like the No-Stick variety)
-large serrated knife
-flexible cutting sheets
-flashlight
-dish soap
-picnic plates
-bag with plastic utensils & napkins
-gallon size zip-top bags
-corkscrew

I'm currently searching for a slightly larger bag, because our Pyrex dishes don't fit in it.  Two 3-cup Pyrex dishes (with lids) also travel with us, because the glass is microwave-friendly.  The 3-cup size is just large enough to cook a package of Daiya macaroni and cheese noodles.  (Drain them with the colander, and then return to the Pyrex dish to mix in the cheese sauce. It's a tight fight, but it works.)  Currently, I need to remember to pack them when we go, so a larger bag will let them remain packed.

We're definitely going to need a larger bag, because after this trip, we've determined we need to add a few more things:
-a paring knife
-a sharpie (for labeling cups)
-a pair of scissors
-collapsible measuring cups

I will admit that 'minimal" is not how I'd prefer to cook every day, but for a week or two on the road, it's adequate. I wouldn't want to be without my good French knife, long term, but for the sake of having ONE multi-tasker, a serrated knife cuts tomatoes as well as raw chicken.  (Just wash between!)  We actually have managed to cook dinner without the baking pan (I once made a roasting pan for meatloaf out of a baking sheet and aluminum foil), but it's definitely much easier to bake brownies with a real pan.  (No-Stick Foil doubles as a pan liner and wrapper for the leftovers.)


We also take our electric skillet (plus spatula and pair of tongs, tucked into the kitchen bag), if we're not going to have access to a real kitchen.  Often we'll make one food item in it (pancakes, eggs, saute-cut meats, etc.) and use the hotel's microwave to heat side dishes (sausage links, baked potatoes, macaroni and cheese, etc.)   We've even "baked" chicken nuggets and cookies in the skillet!


With a little planning and some minimalist packing, hotel eating can be just as good as at home!


©2012- 2015 Adventures with Jude. All rights reserved. All text, photographs, artwork, and other content may not be reproduced or transmitted in any form without the written consent of the author. http://adventureswithjude.com

Monday, December 7, 2015

A Lesson in Proportions (F is for French Toast)


French Toast is probably one of easiest things in the world to cook.  If you asked the menfolk in this house, they'd tell you how:
  • Mix eggs with milk.
  • Dunk bread.
  • Plop in a frying pan.
  • Wait a minute and then flip.
  • Wait another minute, put on plate, drown in syrup and inhale.
 And then they'd look at me and say, "How many eggs, and how much milk?"

I never really thought about "how much" of each.  I tend to be an "Eh...that looks good!" type of cook, so my "official" French toast recipe when I make it is "Couple of eggs...glug of milk...maybe another glug if it's too thick...dump in some cinnamon...cook..." which really isn't helpful when you're directing others how to make something.   I prefer to make it a little heavier on eggs, so that there is more protein in the meal, but sometimes that means if you undershoot the milk, you wind up with scrambled-egg-bread, and not French toast.  We've also made this Crockpot French Toast Casserole, but that is a bit "wetter" than regular French toast, to allow for the long cooking time.  It took a little bit of trial and error to find the right balance. I can't say this is exactly scientific on how much you need, but we finally figured out what was a good balance between eggs, milk, and bread for us.  We finally settled on:

For every two slices of bread:

1 egg
1/8 cup milk (dairy, soy, coconut, hemp, etc.)
1/8 tsp cinnamon

Now, I know, 1/8 cup of milk is a weird measurement.  It's the equivalent of 2 Tablespoons, if you're measuring with utensils.  (You mean, "glug" isn't an official unit of measure?)  However, since we tend to make French toast practically by the loaf, writing the base measurement in "cups" helps with the math.

I needed pictures for this post, and texted Luke, "Want some French toast?"  It's rare for him to not want some, but I figured if he didn't, I would just stick it in the fridge for morning.  Apparently, in the boys' bedroom, they were running a 2 hungry teens-for-1 text special because both Luke and Matthew appeared almost instantly. (No, I'm not that lazy -- the little boys were already asleep so I didn't want to wake them by yelling.)    Since I was taking pictures, they got to cook.  I asked them how hungry they were, and each decided he wanted 4 slices.  Because we've determined the ratio of bread to egg-and-milk, they just had to determine that that was 2 recipes per person, or 4 total.  That meant they needed:

4 eggs
1/2 c vanilla hemp milk
1/2 tsp cinnamon


Easy!  Matthew got to prep, Luke got to cook, both got a second dinner, and I got pictures. 


This is why I also still have to supervise them.


I think they've watched enough Tangled.  F is for French toast, not Flynn Rider!


©2012- 2015 Adventures with Jude. All rights reserved. All text, photographs, artwork, and other content may not be reproduced or transmitted in any form without the written consent of the author. http://adventureswithjude.com

Monday, November 30, 2015

Vegan Coconut Rice Pudding (E is for Eggnog)


It's another week of Blogging Through the Alphabet, and we're at letter E.  My "E" word for the week is eggnog.

Eggnog is highly anticipated around here.  Luke loves eggnog, and doesn't question why it now appears in stores as early as mid-October.  He just stocks up.  Once regular eggnog appears in the stores, Matthew starts asking if "his" eggnog - made with coconut milk - is out yet.  I'm not entirely certain that "eggnog all year" isn't on their Christmas wish list.

This coconut milk rice pudding uses arborio rice and a risotto technique to help thicken the pudding, so that you don't need eggs to make a creamy custard-like sauce.  Cinnamon, cloves, and nutmeg give it year-round eggnog flavor, and are added at the beginning so they can be absorbed into the rice along with the liquid.   A bit of rum adds another traditional flavor, but you can substitute vanilla extract if you prefer.


Vegan Coconut Rice Pudding

1 1/2 c. cream of coconut
2 c. water
1 1/2 c. arborio rice
2/3 c. sugar, divided
1 tsp. cinnamon
1/2 tsp. nutmeg
1/4 tsp. cloves
pinch salt
1 Tbsp rum or vanilla extract

1.  Combine cream of coconut and water.

2.  Place rice in a saucepan.  Cover with about 1/2 cup of coconut mixture.  Add 1/3 cup sugar nd aspices.  Bring to a boil, stirring constantly, until the rice has absorbed all of the liquid.

3.  Add another cup of coconut mix plus 1/3 cup sugar.  Stir until rice has absorbed all of the liquid.

4.  Add remainder of coconut mix, plu salt and  rum/vanilla.  Stir until rice has absorbed all of the liquid.

Serve warm.  


 I topped mine with a little CocoWhip and a bit of granny smith apple.  (Raisins would work, too, if you're a rice pudding traditionalist.)


©2012- 2015 Adventures with Jude. All rights reserved. All text, photographs, artwork, and other content may not be reproduced or transmitted in any form without the written consent of the author. http://adventureswithjude.com
Related Posts Plugin for WordPress, Blogger...
Pin It button on image hover