Showing posts with label Summer Crew Hop. Show all posts

Friday, August 9, 2013

Yummy Crafts


Cooking beautiful and delicious foods is an art.  It's also perfect for hands-on homeschooling, because there's so much that you can learn in the kitchen.  Sure, there's the obvious "cooking"  - but what about Religion?  Science? Art? You bet!  We love doing arts-and-crafts time in the kitchen -- and getting to eat our homework.

Neal is a descendent of Lithuanian and Ukranian Jews.   Family recipes have been handed down through my mother-in-law's family, and I'm so happy to share them with my children.   (Food is one place where Catholics should have paid more attention to their ancestors!)  We made Mom Mom's Hamentashen recipe at Purim, while studying the story of Queen Esther.

Hamentashen


What's better than learning about different types of rock? Eating it!  Fudge is a candy that starts out as a liquid and turns into a solid - it's an igneous "rock." Here's science in the kitchen!

Igneous Fudge

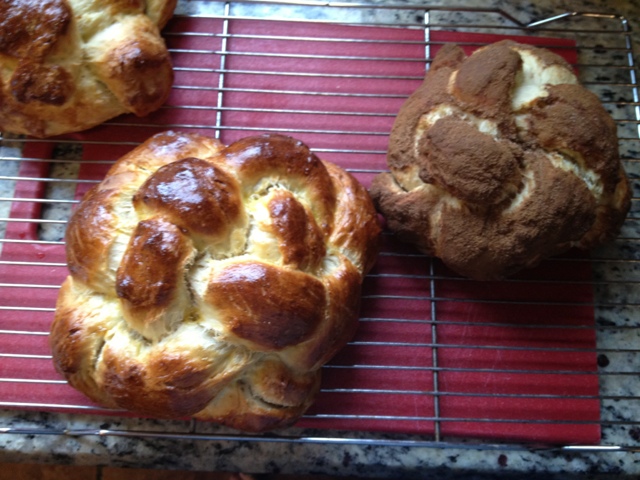
Art and symbolism?  You bet.  Is there anything more gorgeous than this Challah, braided into a round loaf to celebrate Rosh Hashannah?   (I admit, these are Jude's.  His were beautiful, and mine were insanely lopsided.)  Plus, we learned about friendship and sharing - this recipe belongs to a dear person who has been a friend of mine for eight years. 

Rosh Hashannah Challah


Finally, how about self-sufficiency?  When you have severe allergies, often you have to make your own foods "from scratch."  Strawberries are one of a very few safe foods for Celia and Damien, so when they were in season, we got tons of them and put them up for winter.   Commercially preserved fruit often has corn derivatives in it, which Celia is extremely sensitive to.   We made ours with nothing but strawberries and pure cane sugar.   Bonus: once the strawberries are eaten from the jars, we can use the syrup to make marshmallows.

Strawberries Canned in Syrup

You want to make sure you follow canning safety rules scrupulously.  Strawberries are delicious; botulism is not.

Ingredients:

Strawberries
1/2 cup sugar per quart of berries

Note: 3 pounds of fresh berries will give you two pints (one quart) of processed fruit.

Directions:

Wash and hull berries.


An easy way to do this - use a drinking straw! Push it through from the bottom to the top, popping the caps off.

remove strawberry hulls with a drinking straw

If you have a lot of strawberries, this will take a while.  You'll probably be very relieved when you find the bottom of the boxes.

that's a lot of strawberries

Add 1/2 to 1 cup sugar per quart of berries.


Stir to coat the berries completely.


If you have time (or a less anxious helper), cover and allow the berries to sit for 6 hours.  If you do, you only have to heat the berries to steaming in order to jar and process.  If you are in a hurry and don't let them sit, you will need to boil them for a few minutes to make sure that the sugar is well-dissolved in the juice before processing.

pouring strawberries into canning jars


Fill the jars carefully to 1/2" from the top, wipe the rims, and seal the jars.  Process in a hot water bath for 10 minutes for pints, 15 minutes for quarts.  If you are more than 1000 feet above sea level, add 5 minutes for altitudes 1000-6000 feet, 10 minutes for above 6000 feet.   Remove from the canner, and allow to cool.  Check seals - if the jars are not properly sealed, either store in fridge for up to 2 weeks or reprocess.

Several batches later, we have about 30 pints of strawberries in syrup to enjoy all winter!

home-canned strawberries

Yum!   Learning is fun when there's something delicious waiting at the end.


Click on the button below to read what my fellow Crew members are blogging about. With topics ranging from Reading to Road Trips and Curriculum inbetween, there's something for everyone!

Summer Blog Hop


Other hungry friends:
  
Photobucket

©2012- 2013 Adventures with Jude. All rights reserved. All text, photographs, artwork, and other content may not be reproduced or transmitted in any form without the written consent of the author. http://adventureswithjude.com

Thursday, August 8, 2013

Upcycled Crafts


While I keep a general stash of craft supplies on hand, some of the best supplies are (almost) free.  Packing boxes, paper towel/toilet tissue rolls, and formula cans get hoarded as well for projects.

Last winter, we used a box and cardboard rolls to make a Nativity Set, complete with Magi.

nativity set from recycled boxes and cardboard tubes


And here's a couple of Amazon boxes, along with some duct tape and the kitchen broom, transmogrified into a caravel:

upcycling boxes into an explorer's caravel


We even made some some octopuses that went visiting over at The Usual Mayhem!

toilet roll octopuses

Here are two new crafts.  I know I have a lot of tubey friends, and we are always looking for something to do with empty formula cans.   We covered cans with some pretty fabric, ribbon, and glitter paint, and they are now containers for Celia's hair clips.

cover a can with pretty fabric to make a barrette bin


Finally,  silly birds made from a paper towel roll.  You can use as toilet tissue roll, but then you need one per person. I like paper towel rolls because I can cut them in half and give each little boy a piece when we use them.  Originally, they were intended to be owls - like these cuties.

Photo and craft idea: Natural Kids/naturalkidsteam.com

But then the boys decided to make them "Alien Owls" with crazy feathers and extra eyes.


alien owls

To make these:

Cut a paper towel roll in half, or use a toilet paper roll.


Bend the top edges together, overlapping slightly, to make the pointed ears.


Paint.


 Add google eyes and feathers.


I hope I've convinced you to have three waste bins - one for trash, one for recycling, and one for "craft supplies."


Click on the button below to read what my fellow Crew members are blogging about. With topics ranging from Reading to Road Trips and Curriculum inbetween, there's something for everyone!

Summer Blog Hop


©2012- 2013 Adventures with Jude. All rights reserved. All text, photographs, artwork, and other content may not be reproduced or transmitted in any form without the written consent of the author. http://adventureswithjude.com

Wednesday, August 7, 2013

Crafts for different crowds


As much as we love educational crafts, sometimes we like doing some "just for fun."  And yes, I have picked some that are gender-geared. 

Jewelry is always popular with the girls.  Celia recently celebrated her 9th birthday with a sleepover.  (Yes, five 9-year-old girls! We must be crazy!)   For activities, she chose mani/pedis and arts and crafts.  Among the items we made were some bracelets.  I bought pearl beads and stretch cord, and each girl made a bracelet.  We used the same beads and craft glue to make matching barrettes. 

Beaded necklaces always seem popular with the Grandmothers.  (I think so far each has six or seven of them! They're good sports!)  For a Mother's Day gift, Jude made one for each of our moms, and then he made one for me and Daddy (his idea!)  They're great for practicing fine motor skills, color patterning, and even letter recognition and spelling (even if they do get strung upside down).


Boys-centered crafts are always a bit "harder" for us. Mainly because most academic crafts really are for either gender, plus Jude likes doing "girly" crafts - he'll make a necklace and give it to Mimie or Grammy.  He likes thing that involve glitter and paint - the messier, the better! Here's a cute boy craft (though it could go for a girl as well) - a superhero cape made out of a repurposed shirt.

Superhero Cape

Materials:
1 old shirt
scissors
items to decorate cape (glitter, felt, glue, etc.) if desired

Note: We used one of Luke's no-longer-needed uniform golf-style shirts. I purposely chose one with buttons to make it easier to get on and off without stretching the neck.  (Ok, plus we had a bunch of shirts with his school's name on them that had no other real use.)  You can use a T-shirt if that's what you have - it's a good way to extend the life of a shirt that has remnant stains of dinner on it.

You can do this on the table and just cut the sleeves off, too. Jude wanted to be "transformed" into a super hero. Damien just wanted a cape, so I did his without him wearing it.


Directions:

1.  Starting at the hem, cut up and over the shoulder to the other hem, removing the sleeve.


 2. Repeat to remove other sleeve.


3.  Remove the collar, leaving the seam intact.  (This will help keep your neckline sturdier.  I also insisted on taking it off him for this - the scissors were too close to a wiggly head.)  Remove the front of the shirt but cutting across the front, just below the button placket.  (If you're using a t-shirt, cut about 1" from the collar/neckline.)

4.  Try your cape on!

5.  You can take it off and decorate it if you want.  Or you can just zoom off to save the world!


It doesn't matter if you're a boy or a girl, there's a craft for everyone!


Click on the button below to read what my fellow Crew members are blogging about. With topics ranging from Reading to Road Trips and Curriculum inbetween, there's something for everyone!

Summer Blog Hop


©2012- 2013 Adventures with Jude. All rights reserved. All text, photographs, artwork, and other content may not be reproduced or transmitted in any form without the written consent of the author. http://adventureswithjude.com

Tuesday, August 6, 2013

Crafts for Every Subject!


Arts and crafts are a great way to help students learn!   Crafts can be found for nearly any subject, and the details adjusted based on grade level.  Here's my first example!


Learning about cultures is a great way to use arts and crafts.  It can be adapted based on topic and the student's level.   For example:


 Let's study Hispanic holidays.  For a young child,  a calabaza coloring page and a story that celebrate the holiday Dia de los Muertos might be a sufficient introduction.   The coloring page reinforces the lesson on the holiday, but also provides an opportunity for fine motor skill practice, creativity, identifiying and combining colors, etc.  In fact, many of Jude's holiday lessons are a book-and-craft combo (check out our Holiday Books collection - it's a work in progress because I put a lot of books away before I remembered to pin them!) 

However, this might be too simple for an older student.  This is one of Luke's assignments.  His task was to build a clock, based on a theme in Hispanic culture.  He chose  Las Fiestas del Año.  Each hour represents a month of the year, and each vignette is an illustration of a Hispanic holiday or festival held during that month in a Hispanic country.  To go through an entire year, many different countries are represented, showing how widespread the culture is.  On the back of the clock, he affixed a list of the months, the name of the holiday,  the country where it is celebrated, and a short description.  The project involved research, writing, and artistic expression/interpretation, and really, was a lot more fun than writing a paper.  Assembling the clock also helped him learn in a tactile way - placing specific holidays in each area, crafting the parts, etc. - which helped reinforce what he was learning.

Almost every subject can be "craftified" (as Matthew puts it).

Science

Here's an example of chromatography.  Matthew made this apron, but you can do a bandanna, a T-shirt, or a tote bag.

Materials:
cotton-based fabric
Sharpie or other permanent marker
Rubbing Alcohol
Medicine syringe or  eyedropper
White paper towels (ones with patterns may cause a dye transfer, if you want to use a cloth towel make sure it is color-fast)


Cover your surface to protect it.  (We used a trash bag since my vinyl tablecover is currently packed away while we refinish the schoolroom floors.)  Place layer of paper towel underneath to absorb the alcohol.  (If you're using a shirt or tote,  place a piece of plastic and towel between the layers so it doesn't dye the back as well!)


Draw on the fabric with the Sharpies.


Dribble rubbing alcohol onto the fabric.   The wetter the fabric, the more the color will run, because there is more solvent to separate the dyes in the marker.


Allow to dry.  How long it takes will depend on how saturated it is, however rubbing alcohol dries faster than water so it shouldn't take too long.  It took about an hour for our apron to dry totally.


Why you want to protect your table:


Here's a idea for using up leftover bits of paper and felt: Mosaics.

Mosaics, or using small bits of colored stone shaped into a picture, have been made since ancient Greek and Roman periods on walls and floors.  Many have been lost over the years, but a good number survive, especially in churches and cathedrals.  You don't get much more "artistic" than the word "mosaic" - derived from the Greek mouseios meaning belonging to the Muses.  Modern mosaics can be anything from a huge portrait to a garden stepping stone.

Mosaics are a great way to use up bits and pieces of leftover felt and construction paper!  When we do a project, I stuff the scraps into a zip-top bag, and tuck them away.  Sometimes, especially if it's a larger leftover, we can use it for another project, but the little "inbetween other cuttings" scraps are great for mosaics.  You can do a "theme" to tie it into any lesson, or just do a "create something for fun" mosaic, by cutting the scraps into smaller pieces and gluing them into a design.  It can be anything from an elaborate scene to just a freeform shape.


 Click on the button below to read what my fellow Crew members are blogging about. With topics ranging from Reading to Road Trips and Curriculum inbetween, there's something for everyone!

Summer Blog Hop


©2012- 2013 Adventures with Jude. All rights reserved. All text, photographs, artwork, and other content may not be reproduced or transmitted in any form without the written consent of the author. http://adventureswithjude.com
Related Posts Plugin for WordPress, Blogger...
Pin It button on image hover