

This week's agenda is mostly fun. The only "real" school I had on our agenda was to take the Cumulative Review math test so we could put this chapter behind us. Jude is getting extra helpings of his favorite "subject," arts and crafts. We made two tree ornaments and read stories that went with them.
The Legend of the Candy Cane
| Photo credit: Amazon.com (Book store) |
I had seen several recommendations for a lapbook lesson that was centered around this book. I liked the idea, and reviewed the content, but much of the activity was too much for Jude. However, we try to read a book a day, so I decided to get it for him and just do a craft activity. We actually downloaded the Kindle version - it was slightly less expensive and available immediately. It has slightly different artwork (cover and inside).
 |
| Photo credit: Amazon.com (Kindle Store) |
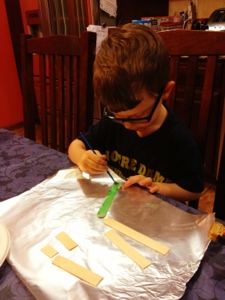
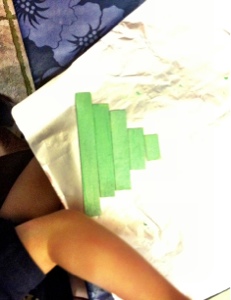
I did all of the prep work for this one. I cut out two red candy cane shapes, and the white stripes. Jude assembled them:


I also took a needle and thread and made a hanging loop at the peak of the cane. You can drape them over the tree like a regular candy cane, but I was afraid the felt would eventually become misshapen. There is no real "sewing" involved -- the needle really is to just get the thread through without needing to cut a hole.
The Littlest Christmas Tree
| Photo credit: Amazon.com |
This is an adorable story about a Christmas tree that dreams of being taken home. For five days leading up to Christmas Eve, the Littlest Christmas Tree sits on the tree lot hoping to be chosen, but he is never a family's "perfect" tree. The owner closes up to go home on Christmas Eve night, and he is the only tree left on the lot. When man takes the Littlest Christmas Tree home to his his son,his wish has come true - he is someone's perfect tree.
To make this craft, you need:
4 large craft sticks ("tongue depressor" size)
green paint/paint brush
marker
scissors
glue
aluminum foil (we used no-stick foil)
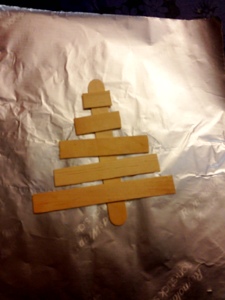
Set one stick aside, and leave whole.
Take three sticks, and cut the rounded edges off. Set one aside, and place the other two facing you horizontally. Cut the first stick about 1/4 down, so you have two pieces 1/4 of the stick wide and one 3/4 wide. Cut the second stick so you have two pieces 1/3 and 2/3 wide. (Note: it's better to cut them before painting, in case a stick should crack and you need a spare. But I forgot to take a picture before we painted.)
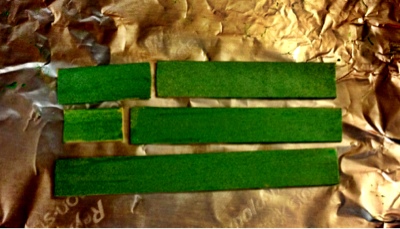
Check to make sure they create a reasonably symmetrical tree. Turn the uncut stick perpendicular to you (it will be the trunk) and lay the cut sticks across it, longest at the bottom, shortest at the top. It doesn't have to be mathematically perfect, just "looks close."
Paint your sticks green. We used a shimmer paint, but plain paint would work fine, or even a large-tipped marker would work.
Optional step for if you have smaller students: When dry, lay your branches back across the "trunk." Mark a dot where the pieces intersect. This becomes a landmark for where the glue should go -- definitely helpful smaller students space the branches out.

Put branches in size order. (Surprise! Math lesson!)

Glue the branches into place. Trees aren't perfectly symmetrical, so if they're a little uneven, it's OK.

To hang, gently poke a hole in the top and slide a piece of thread or dental floss through. (We used a tack nail - make sure you use something really small so the sticks don't crack.) Alternatively, you could wrap the thread under the top "branch."
You also can decorate your tree with sequins, mini-pom poms, etc. Jude decided he liked his tree plain.

Christmas is for sharing, so we are linking up with a few friends.


love these! the books and the crafts! thanks for linking up with me!
ReplyDeleteI kept this post up on my computer so that Lauren and I could make these. I guess I'll just pin it and try again next year. So many good ideas... so many other commitments during the holiday season...
ReplyDelete